Showing posts with label Halloween. Show all posts

Halloween Door Decor 2014 Ideas

Easy 2014 ideas for Halloween Door Decor , quick and easy projects to made it by you self,
I hope you like it ... Enjoy !!!


A Pumpkin Gathering 

A rustic chair next to the front door gets a shot of Halloween cheer when topped with a collection of gourds, squash, and pumpkins. The doorway is wrapped with a garland made of flexible twigs bundled with wire and woven with leafy branches. Mini pumpkins hang from a beam overhead while a faux bois urn supports a stack of pumpkins in graduated sizes nearby.


Bountiful Door Decor 

Celebrate the beauty and bounty of the Halloween season with pumpkins, squash, gourds, and flowers ripe with color. Nature's bounty is so pretty and interesting on its own that it needs few embellishments to become a wonderful focal point. Carve or paint a squash or gourd with a cheerful jack-o'-lantern face to add a bit of whimsy.


Halloween Sign 

Create a hotel sign to welcome guests at the front door of your haunted Halloween abode. An old cast-off post gets new life when paired with a DIY sign. Simply assembled from 1x8-inch boards, the sign is painted and attached with eye hooks and chain to a vintage signpost. Be sure your sign reads "vacancy" so trick-or-treaters will know they can approach.


Branch-Filled Bucket

Who can resist these adorable Halloween treat trees to flank your front door? They're easy and festive. Fill an orange bucket with sand and insert large tree branches painted black. Cover the sand with sheet moss. Add the treat buckets and a few small black crows. Invite kids to help themselves to mini buckets of treats hanging on the branches.


Spooky Porch

With a little "witchcraft" you can set the stage for a spooky evening at your front door. Light a warm path to your door with luminaria and a lighted grapevine garland framing the doorway. Dangle a few faux bats and spiders near porch lights. Add black witch, cat, bat, and ghost silhouettes made of heavy paper to windows to increase the spooky ambience.


A Family Fun Front Door

'Tis the season for jack-o'-lanterns and they are everywhere on this playful front door and porch. Simply paint expressions on paper lanterns and hang in a cluster for maximum effect. Then make Halloween pinatas on sticks and place in planters to flank the entry. Crepe paper jack-o'-lanterns put the finishing touch on the door.


Halloween Web

Lengths of black ribbon and yarn and a bit of strategic weaving are all it takes to add shadowy spiderwebs to your front windows and door. Dangle a few creepy critters nearby to complete the hair-raising picture. Eek!

Posted in , , | Leave a comment

Easy 2014 Halloween Door Decor Ideas

Easy 2014 ideas for Halloween Door Decor , quick and easy projects to made it by you self,
I hope you like it ... Enjoy !!!


Painted Pumpkins with Message 

Your visitors will have no doubt that they're welcome when they see this vintage wheelbarrow with a welcoming message at the front door. Paint your sentiments on two large pumpkins with black or white paint. Place the pumpkins in the wheelbarrow and surround them with squash, gourds, bittersweet, and autumn leaves.

Silhouette Door Art

Dress up a bare glass door with a spooky silhouette. Tape together multiple sheets of black cardstock or sheets of black crafts foam and you can create a spooky scene big enough to fill the door. Trace your design, cut it out, and adhere it to the door with tape or spray adhesive.


Witch Door Display 

Park your witches' brooms right next to the front door. Make your own brooms by wrapping twigs and grass around wooden dowels. Then mark your Halloween "parking lot" with a sign made by printing on iron-on transfer paper and ironing the design onto a painted stretched artist's canvas. Spooky high jinks welcome here!


Fall Harvest Door Display

Orange and bronze mums, pumpkins, gourds, and a bundle of cornstalks from the local garden center can transform an everyday door into an inviting fall display perfect for Halloween. Pull up a straight chair or rocking chair and drape it with a cozy quilt. Add a grapevine wreath and your door is a little bit country—and a whole lot inviting.


Eerie Entry

Since white objects are highlighted at night, a grouping of ghostly door decor made from painted gourds is sure to catch the eye and chill the heart in the dark. Use black paint to create the spirited expressions, and dangle the gourds from dormant vines, porch rafters, or tree branches. Finish off your front-door masterpiece with dried bittersweet and a painted twig wreath.


Frightful Front Door

Set a dark mood by disguising the view inside the front door. Cut black paper to fit the door glass and any side windows, then trace and cut out Halloween shapes. Tape the black paper to the windows and cover the cutouts with yellow tissue paper. Your spooky designs will glow when you turn on the interior lights. Line the path to the door with glowing pumpkins.


Window Halloween Display

Make a spirited first impression by turning a sidelight window into a gruesome message board. Piercing cat eyes and bold lettering send a cautionary note to all who come to your front door. Use black and white papers and green stickers for cat eyes. For the message, print large letters from a computer, trace them onto black paper, and cut out. Tape the letters and eyes to the glass.


Jack-o'-Lantern Door Display

Dress your front door with this smashing Halloween decoration that's simple to make. Crafted from a halved foam pumpkin, the jack-o'-lantern gets its charming personality when you add painted facial features, silk leaves, and bittersweet. The spooky final touch: an artificial crow on top!


 Doorstep Halloween Urn Display 

Ever wondered what to do with those cute, inexpensive urns from the crafts store? With a simple coat of spray paint they become spooky Halloween decorations. Stuff cotton batting and blocks of crafts foam inside. Stick white branches into the foam as desired. Cut-from-paper black bats, fabric leaves, black webbing, and a few creepy-crawly spider accents complete the look.


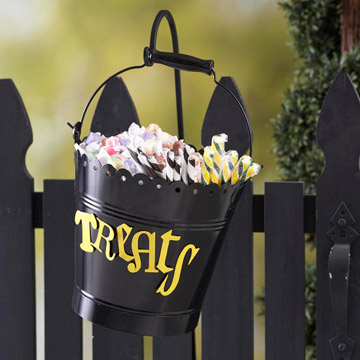
Halloween Treats Bucket

No time to man the door this Halloween? Set out a cute bucket at your gate for a grab-and-go way to celebrate the holiday. Spray-paint a bucket black, coating it a few times for full coverage. Paint wood letters with glow-in-the-dark paint to spell "treats" and attach to the bucket. Stick a shepherd's hook into the ground and hang your full-to-the-brim treat pail from it.


"Beware" Banner 

Offer a warning welcome gate-side with a pretty banner sharing a Halloween phrase. Create a basic triangle template and use it to trim six triangles from outdoor-ready fabric (ours is the type that's used to cover picnic tables). Back each triangle with black cardstock; trim. Paint wood letters a bright color (glow-in-the-dark paint is a fun option), and adhere to each triangle. Use purple rickrack to create the banner. 
Editor's Tip: Spray your project with a clear coat of waterproofer or plan to bring it in on damp days.


Halloween-Inspired Paper Lanterns

Infuse plain white lanterns with spooky spirit in minutes. Run lengths of black ribbon along the surface of an open paper lantern (we made one lantern with ribbon and one without). Print basic jack-o'-lantern clip art (a quick online search offers lots of options) onto white paper. Trim and tape to the front of the lantern. Hang it on your porch for a delightful welcome.

Posted in , , | Leave a comment

Halloween Door Decor 2014 Ideas

Easy 2014 ideas for Halloween Door Decor , quick and easy projects to made it by you self,
I hope you like it ... Enjoy !!!


A Pumpkin Gathering 

A rustic chair next to the front door gets a shot of Halloween cheer when topped with a collection of gourds, squash, and pumpkins. The doorway is wrapped with a garland made of flexible twigs bundled with wire and woven with leafy branches. Mini pumpkins hang from a beam overhead while a faux bois urn supports a stack of pumpkins in graduated sizes nearby.


Bountiful Door Decor 

Celebrate the beauty and bounty of the Halloween season with pumpkins, squash, gourds, and flowers ripe with color. Nature's bounty is so pretty and interesting on its own that it needs few embellishments to become a wonderful focal point. Carve or paint a squash or gourd with a cheerful jack-o'-lantern face to add a bit of whimsy.


Halloween Sign 

Create a hotel sign to welcome guests at the front door of your haunted Halloween abode. An old cast-off post gets new life when paired with a DIY sign. Simply assembled from 1x8-inch boards, the sign is painted and attached with eye hooks and chain to a vintage signpost. Be sure your sign reads "vacancy" so trick-or-treaters will know they can approach.


Branch-Filled Bucket

Who can resist these adorable Halloween treat trees to flank your front door? They're easy and festive. Fill an orange bucket with sand and insert large tree branches painted black. Cover the sand with sheet moss. Add the treat buckets and a few small black crows. Invite kids to help themselves to mini buckets of treats hanging on the branches.


Spooky Porch

With a little "witchcraft" you can set the stage for a spooky evening at your front door. Light a warm path to your door with luminaria and a lighted grapevine garland framing the doorway. Dangle a few faux bats and spiders near porch lights. Add black witch, cat, bat, and ghost silhouettes made of heavy paper to windows to increase the spooky ambience.


A Family Fun Front Door

'Tis the season for jack-o'-lanterns and they are everywhere on this playful front door and porch. Simply paint expressions on paper lanterns and hang in a cluster for maximum effect. Then make Halloween pinatas on sticks and place in planters to flank the entry. Crepe paper jack-o'-lanterns put the finishing touch on the door.


Halloween Web

Lengths of black ribbon and yarn and a bit of strategic weaving are all it takes to add shadowy spiderwebs to your front windows and door. Dangle a few creepy critters nearby to complete the hair-raising picture. Eek!

Posted in , , | Leave a comment

2014 Clever Halloween Centerpieces Ideas

Use these centerpiece ideas as inspiration for your next Halloween party or as festive additions to your home to add some fright to your holiday table .
i hope you like it .. Enjoy  !!


Halloween Glass Vases 

Glass block vases become one-of-a-kind Halloween centerpieces with die cuts and spooky scrapbook paper (available at crafts stores). To make, use spray adhesive to attach the papers; (spray the back of the paper, not the glass, to avoid streaks). Place sand and tapered candles inside the vase for a haunting glow. 
Editor's Tip: Use clear plastic blocks in lieu of glass vases. Be sure to nix the candles or opt for battery-powered versions.


Black and Orange Halloween Candles 

Wrap decorative scrapbook paper around large orange and black candles to create this simple Halloween centerpiece. An orange table runner makes the black candle pop, overturned black bowls add height to the decoration, and black spiders and white Halloween candies add creepy-crawly fun at the base. 
Editor's Tip: Be sure to keep an eye on how fast your candles burn, and trim scrapbook paper accordingly.


Raven Urn Centerpiece 

You need only a few household items and a little nature to create this haunting-yet-simple Halloween centerpiece. Gather knotted, rustic sticks from your yard or neighborhood to place in a basic urn, and add bits of moss to get the fright just right. Use free clip art to trace and cut out ominous black ravens from construction paper -- the finishing touch for this Halloween centerpiece.


Candleholder Goblets Display 

Thrift-store glasses become centerpiece-ready with a coat of black spray paint. Choose textural goblets for the most detail, set them upside down to spray-paint, and tape a few to preserve the tops. Touch up any edges with a black permanent marker after the goblets dry. Note that after decorating the goblets they are meant for display only. 
Editor's Tips:
Use sand to raise your votives to desired height.
Place the goblets on a black tray or a mirror embellished with spray paint to make the centerpiece both cohesive and portable.


"Boo" Embroidery Hoop Centerpiece

Basic embroidery hoops set a spooky scene at your Halloween table. To make, stretch black costume fabric or lace through the painted hoops; trim extra fabric. Next, spray-paint planters for bases, then add enough florist's foam inside to secure a painted dowel through the middle. Finish with a square of black-and-white patterned paper atop the planters and a hauntingly fun message spelled out in painted wood letters. Hot glue can help secure the dowels and wood letters.


Ribbon Spool Stackers 

Colorful spools of ribbon display equally eye-catching desserts. Place scallop-edge die cuts (available at crafts stores or cut from a die-cutting tool) between the ribbon spools with a touch of adhesive to ensure stability. Top with a decadent treat for a sugary-sweet Halloween centerpiece. 
Editor's Tip: Arrange the spools in a cluster around an accent piece, such as a colorful vase, or in a straight line on a table runner to maximize creativity.


White Pumpkins on Black Stands

Pumpkins painted white and covered in glitter stand out when placed on stark black stands. Use double-sided tape or an adhesive spray to get just the right amount of shine for this glitzy Halloween centerpiece.


Recycled Halloween Centerpiece 

Scrapbook papers and floral accents are all it takes to "upcycle" yesterday's tin cans into a "green" Halloween centerpiece. Standard- and economy-size tin cans work well for this craft, although the more varied the sizes, the more intriguing the display. Wrap with scrapbook paper or add die-cut scenes or stickers as desired. 
Editor's Tip: Keep the cans for next year, or give them away to guests as simple mementos of a frightful night.


Ghost Book Pop-Ups

A stack of old books forms the stand in this spooky centerpiece. To make, cut two basic ghost shapes from pages in the middle of a book, leaving the bottoms attached to their pages. Hold up each ghost with a touch of tape. To complete, use a hole punch or marker to make eyes for this haunting centerpiece.


Chalked Skeleton Centerpiece

Spray-paint Halloween props with black chalkboard paint, then outline them with chalk for frightfully aged flair. Fill the cauldron with a decorative bottle, handpicked beverage, or a tasty Halloween treat.

Posted in , , , | Leave a comment

Quick Halloween Centerpieces Ideas 2014

Use these centerpiece ideas as inspiration for your next Halloween party or as festive additions to your home to add some fright to your holiday table .
i hope you like it .. Enjoy  !!

Jack-o'-Lantern Halloween Centerpiece

Miniature jack-o'-lanterns make a big impact when arranged on footed cake stands and displayed on a vintage tray. Place battery-powered candles inside each hand-carved pumpkin, and let your guests enjoy the glow.


Book-and-Pumpkin Centerpiece 

Books, pumpkins, and gourds compose this Edgar Allen Poe-worthy Halloween centerpiece. Use black books, or craft quick book covers with black construction paper. 
Editor's Tip: Incorporating raven accents on items such as place cards will make the spooky Edgar Allen Poe vibe even more apparent.


Pumpkins in Glasses Centerpiece 

This centerpiece with pumpkins and flower glasses plays a trick on the eyes, as miniature pumpkins placed in water-filled glasses appear to float in the water. (Spoiler: They're just too big to sink all the way to the bottom.) Bright orange flowers resting in a glass and small, shallow bowl add more orange to this Halloween centerpiece. 
Editor's Tip: To add more color, replace water with black and orange candies or smooth black stones.

Black-and-Orange Skeleton Candle Display

 These tall glass votive holders -- complete with a black jelly bean base -- hold black and orange candles. Spooky skeletons hang on the outside of the votive holders, ensuring an extra-haunting glow when the candles are lit.


Halloween Gourd Centerpiece 

Use rugged old cabinet legs as eye-catching bases in this Halloween gourd display. Elevating some gourds and leaving others on the table, as well as varying the size of gourds, adds quirkiness to this Halloween centerpiece. 
Editor's Tip: Tie ribbon onto the bases in knots or bows to add quick bursts of color.


Floral Jack-o'-Lantern Halloween Centerpiece

A smiling jack-o'-lantern becomes the perfect Halloween vase when you place a container of water and flowers inside. A simple carving (or scraping) that forgoes the typical wide mouth will help the inside container stay hidden. Use a white pumpkin and orange flowers for extra pop.


Pumpkin-and-Candle Halloween Centerpiece 

Nuts, pumpkins, and a large candle dress up a small woven mat in this simple-yet-sophisticated Halloween centerpiece. Fallen leaves tucked into the display add natural fall flair to the decoration. 
Editor's Tip: For a more kid-friendly decoration, use candies, painted pumpkins, and a battery-powered candle so curious fingers don't find a flame.


Pumpkins on White Dishes

Simple white dishes display multicolor pumpkins in this elegant Halloween centerpiece. Use footed bowls, small plates, and candlesticks at varying heights to create an eye-catching display.


Silver Skull Centerpiece

For a centerpiece with both spook and glam, spray-paint a plastic skull silver. Use black feathers to create a to-die-for boa around the "head of the table." Place the skull on a black raised stand or footed dish for a lively Halloween decoration.


Pumpkin Platter Centerpiece

A plain white platter becomes a Halloween centerpiece with a handful of scattered miniature pumpkins and fall accents. The nonlinear look is key with this decoration, so assemble pieces randomly along the platter for an effortless, relaxed look.


Large Pumpkin Bouquet Halloween Centerpiece 

Use a large, tall pumpkin to create this picturesque Halloween centerpiece. Stuff a variety of flowers, fillers, and greenery in a vase inside this simple, hollowed-out pumpkin. 
Editor's Tip: To add a bit of festive fun, tuck tiny Halloween decorations, such as plastic spiders or spooky stir sticks, into the arrangement.


White Pumpkin Vases

White pumpkins double as vases and make for a spook-free Halloween centerpiece. Leaves, orange flowers, and cattails are tucked into a hidden vase or container in the hollowed-out pumpkins.

Posted in , , , | Leave a comment

How to Make a Halloween entry and welcome trick

Add some personality to your entry and welcome trick-or-treaters with a pumpkin topiary in the shape of a totem pole. All it takes is a few faux pumpkins, basic craft supplies and a little imagination.


Materials Needed:
  • 3 faux pumpkins
  • spool of 3/8" wide black craft ribbon
  • black acrylic craft paint
  • white acrylic craft paint
  • small craft paintbrush
  • hot glue gun and glue sticks
  • pumpkin-carving tool or sharp knife 

Select Pumpkins

Select three similarly shaped faux pumpkins.


Cut Hole

Use a sharp knife or pumpkin-carving knife to cut a hole in the bottom of the first pumpkin. Make sure the hole is big enough for the stem of the second pumpkin to fit into. Repeat this step on the bottom of the second pumpkin.


Adhere Ribbon

Cut random lengths of craft ribbon and hot glue them to each of the pumpkins to form mouths.


Paint Eyes

Paint eyes on each of the pumpkins using a small paintbrush and some black and white acrylic paint.


Hot Glue Pumpkins

Use hot glue to attach the first pumpkin to the second and the second pumpkin to the third.

Posted in , , , | Leave a comment
Powered by Blogger.

Search

--Modern Home Dsgn-- MODERN KICHEN,NEW IDEAS FOR EVERY ROOM ,MODERN FURNITURE ,CURTAINS IDEAS... and more